
I enjoyed making the video “Paul³ @Rehearsal”. The central, attractive ides is that you watch a performer improvise with themselves. There is a simpler way to do this, as discussed in Combining Multiple Takes. However, using compositing to help create this performance was, I felt, the most appropriate way to show Paul “playing with himself”. Such work is not the exclusive domain of studios – it’s just a lot of work (although I did tale steps to minimise more complicated forms of compositing). The following is a discussion on how I went about planning how to film and edit “Paul³ @Rehearsal”.
|
Paul Cole, The Drum Academy “Paul³ @Rehearsal” |
A drummer, cloned three times, improvises and perform together. The video was made through setting up several drum kits and cameras around these kits. The drummer, Paul Cole, starts off in one position for the first take, then moves to other positions for subsequent takes, performing in response to playback of recordings made of the previous take. The different takes were then composited in post-production. |
I am now going to take you through some rough storyboards of how I discussed with Paul how we could film ‘Paul playing with himself’. I limited myself to around four cameras, although for the final video I used seven. These storyboards are what I would use as the beginning of any discussion of how to plan such a video.
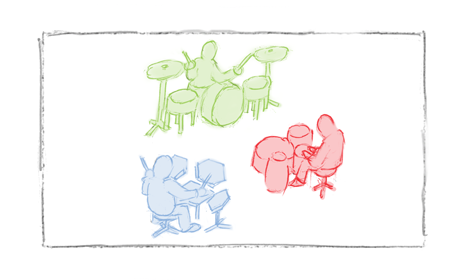
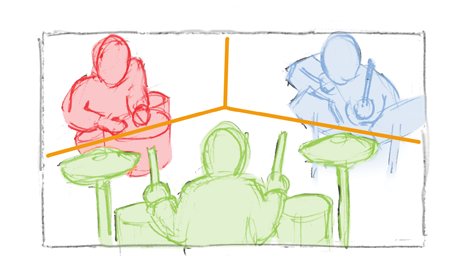
It depends on the musician – but I think three is an interesting limit on how many takes/performances could form the improvisation. For this example, in discussion with Paul, I used three drum kits he felt he wanted to use and have colour-coded them so you can see how I setting up the cameras: Green was the main, standard acoustic drum kit, Blue was an electronic drum kit, and, Red would be some additional drums and percussion.
These are the shots I would intend to record and then use to construct a sequence:
 ——-Green: main acoustic drum kit. ——-Blue: electronic drum kit. ——-Red: additional percussion kit. |
Shot 1, Very Hi-Angle, Very Wide Shot This is a very wide, loose wide shot. It’s good to use occasionally, and to use as a shot for starting and finishing the video, especially if the location is interesting. Whilst only to be used occasionally, it will be a good shot to cut to/from a much closer shot. ——-Also, just in case there are any moments of technical glitches (or performance problems), this shot is so wide that you can’t clearly see what each drummer is doing. You won’t be able to see any small technical or performance issues; and we can cut back to a closer shot once the problem is over. |
 |
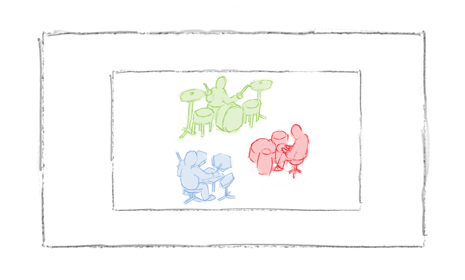
Shot 2, Hi-Angle Wide Shot This is the main wide shot, long-shot. It provides an overview of all that is going on. It is the main, ‘establishing’ shot that would be returned to regularly. Ideally you keep all the different takes within the frame, so no cropping of the figure occurs. Other shots will provide closer views, insights into what is going on. |
 |
Shot 3, Medium-Long Shot To add variety and keep interest, the main wide shot shouldn’t be relied upon. Closer long shots (and medium shots) that take in all three drum kits would be desirable, but from different angles and positions from the main wide shot. These Medium-Long Shots should allow us to see one or two of the drummers quite clearly. The exact composition depends on where the location is. Also, the camera set-ups should ensure no one camera blocks the view of any other drum kit in the wider shots. |
 |
Shot 4, Reverse Medium-Long Shot Following the standard scheme of Shot/Reverse-Shot framing and editing, there should be another Medium-Long Shot that roughly reverses the angle of the previous MLS. Exact framing shouldn’t closely match the previous MLS: it should vary the angle/composition to the other MLS. It allows us to cut between the two MLS and then other wider or closer shots. Also, this shot in itself shows a closer look at what is going on, to help keep the video visually interesting. |
 The three hand-held shots shown are very rough examples. Depending on the location and the position of other cameras and lights, it may be very possible for the camera operator to change position. ——-Also, depending on the camera operator and the camera used, the camera operator could zoom in/out between close-up shot and medium shot as appropriate. This means we can have even more variety of framing than shown here. |
Shot 5, (Hand-Held) Medium Shot The closest shots will frame a Medium Shot, possibly a (loose) Close-up Shot, where one drum kit fills the frame. This now means we have a selection of (roughly) wide, medium, and close shots of some kind for each drum kit, for each take. This allows lots of options in the editing, even when following conventional editing schemes. ——-The main two are: we can now cut in and cut back between different distances to maintain interest in what is happening; it will allows us to cut between these different closer shots when a performance is at its most intense/interesting. As long as we start with the wider shots and gradually cut in to the closer shots, when we later juct cut between shots at will – there should be no confusion to the viewer as to what is being shown. |
 |
Shot 6, (Hand-Held) Medium Shot For each of the three takes, the hand-held camera will end up being in a different position in order not to interfere with the compositing or interfere with the line-of-site of other drum kits. Also, as for other shots, care needs to be taken to making sure shadows from the hand-held camera operator doesn’t fall on the drummer/area around the drummer. |
 |
Shot 7, (Hand-Held) Medium Shot Three takes; three different Medium Shots. Ideally, each of these represents a closer view of an appearance of a drum kit in a wider shot, helping with continuity. However, having the hand-held shots as different as possible from the other wider shots also helps make the editing interesting. So these are shots that during filming can be easily arranged around how the other shots are set-up. We just need to find a space for a camera operator to stand in while they film. |
The above shots will allow nice sequences of shots to be constructed: cutting in from a Wide to a MLS or a Hand-held MS; cutting back from one of the Hand-held Medium Shots to a looser MLS or one of the Wide shots; cutting between the different Hand-held Medium Shots.
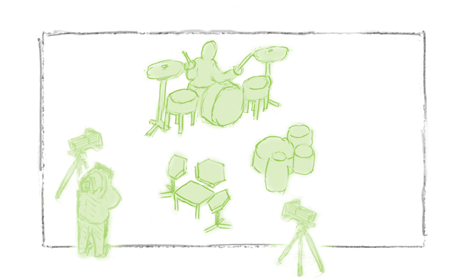
These are the camera set-ups I would use to record the above shots:
 One camera set up, but two shots. |
Camera Set-up 1, Shots 1 & 2 (Hi & Wide) One camera should be set-up as high as possible, looking down. It should be looking down on all three drum kits. This makes compositing the three different takes together very easy. The only real care that has to be taken is setting up the lighting, ensuring the drummer’s (moving) shadow doesn’t fall on where another take’s drummer will be sitting. ——-From this position, using one camera set-up, it should be possible to create two very useful shots. This will be done by first filming an empty studio on the widest lens setting possible. Then, the lens can be adjusted to frame the shot closer for the actual performances. The second, closer shot can then be composited with the footage shot before the performance takes, but after all the lighting and drum kits have been set-up. |
This is an important shot to obtain. A location should be rejected or chosen based on whether or not a wide shot, or a long shot, like this can be recorded by a camera. It doesn’t have to be this wide or high: but it has to be a position where little post-production compositing will be required.
 Above, the original footage for the main acoustic drum kit before compositing. |
This camera should be the first to be set-up, after the drums and lighting and been sorted out. As with filming footage to be used for creating Shot 1 and Shot 2, this will be used to help ensure the compositing of all the three performance takes composite together as smoothly as possible. During performance, cameras will need to be positioned around the drummer; footage filmed before the performance will allow those cameras to be removed easily. |
 Above, after compositing, footage from the main acoustic drum kit is combined from footage from the other two takes. |
The main strength of this shot is that it will be easy to composite. Therefore, should many things go wrong – this, at least, should be our fall-back shot. (At worst, the video could consist of just this shot.) The higher the angle, the higher the position, the easier to just find easy-to-hide divisions between the three areas, the three different takes. Also, from a high position, whatever overlap occurs (the head of a drummer intersects with the bass drum of another drum kit) will be very easy to accommodate compositing. We need to avoid movement that overlaps: this shot ensures that. |
With a wide and a long shot safely (easily) ensured, with cameras close to the ground (lo-angle set-ups) we can afford to start attempting closer groups within the frame. As long as we don’t overlap areas of constant movement, these shots should not be too difficult to composite. For instance, with the main acoustic drum kit – depending on how it is set-up, the area in the bottom third/half of the bass drum may not move very much, and will probably obscure the drummer’s feet. You could then afford to have a drummer’s head, or hands/drumsticks, or a hi-hat move around that area without creating a headache for you in compositing the different takes.
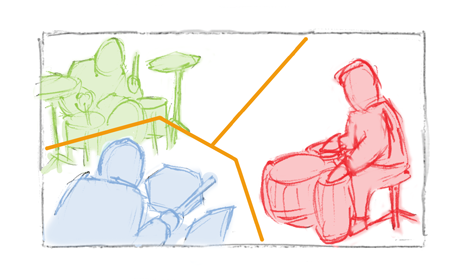 |
Camera Set-up 2, Shot 3 (MLS) To add variety and keep interest, the main wide shot shouldn’t be relied upon. Closer long shots (and medium shots) that take in all three drum kits would be desirable, but from different angles and positions from the main wide shot. These Medium-Long Shots should allow us to see one or two of the drummers quite clearly. The exact composition depends on where the location is. ——-Also, the camera set-ups should ensure no one camera blocks the view of any other drum kit in the wider shots. And if we’re careful – we can overlap some drum kit positions without creating too much work for ourselves. This overlapping also aid believability and enjoyment of watching multiple versions of the same drummer ‘play with themselves’. |
|
Camera Set-up 3, Shot 4 (Reverse MLS) This is a companion set-up and shot to the second camera set-up, third shot. If we really wanted to keep camerawork and editing simple we could limit ourselves to the first two camera set-ups. However, in order to make the camerawork believable and enjoyable, a variety of framing is required. We need to have shots from different angles. They need to be the same kind of selection of shots you would find in a normal sequence depicting a drummer performing. That includes reversing angle, or at least widely varying the angles with across the normal ‘line of action’ camera set-ups. ——-If we have a decent wide/long shot (camera set-up 1), then trying to vary the medium-long shots will help ‘sell’ the experience of watching the composited performance. |
One reason we could get away with just one composited medium-long shot is that we can easily have a wide selection of close-up shots and medium shots framing just the drummer in each take. Close-ups and medium shots bring in the details of the performance, help the viewer participate in the drummer’s actions and experience. However, without the wider establishing shots anchoring those closer shots, throwing in close-ups and medium shots without understanding what they are depicting is just confusing. This will be especially confusing when you have three drummers who are the same person. Making that person wear a different t-shirt for each take only helps a little.
However, having well-framed wide shots and medium-long shots will allow them to be inter-cut with closer shots – and those closer shots will make the final editing more interesting and enjoyable. It is in this sense that trying to have more than one composited medium-long shot allows the closer shots to work more effectively within any edited sequence of shots.
|
|
Camera Set-up 4, Hand Held Shots 5-7 (CU, MS) Now that we have a foundation of wide, long, and medium-long shots, we can now have a selection of shots, mostly in medium and close-up, of just the drummer. Ideally, they should follow the framing of the wider shots. However, if the wider shots are well-framed, closer shots can be more idiosyncratic in their framing and ignore continuity of framing. |
|
|
|
These shots will make the final video more enjoyable, not just because they are adding variety – but these shots allow the viewer to be closer to the performance, more involved in the performance. The video will be a better record of the performance because of these closer shots. The video could also be better because as we have taken care to create well-composed wider shots, we can have more fun with the closer-framed shots, even if the closer shots don’t appear as more-cropped versions of other shots (which is what we should do if we were being entirely conventional in our camerawork and editing).
|
|
Also, we don’t necessarily have to worry about all the closer shots lacking continuity of framing with the wider shots. In all probability the hand-held camera operator, being careful of the lighting (i.e. shadows) and the other cameras (i.e. not blocking their filming of the current drummer’s take), will probably be able to move around a little, or, stand still and then zoom in and out to obtain close-ups and medium shots from that one position. Possibly both. They will be able to stand in areas that, during compositing, will become occupied by the drummer’s other takes, and allow them to record interesting close-ups and/pr medium shots that enrich the variety of shots that can be made available for editing. |
This is a short ‘making of’ video showing the different camera set-ups and shots used for the final video:
|
Paul Cole, The Drum Academy “Making Paul³ @Rehearsal“ |
The main difference between these example storyboards and the final video is that more cameras were used. Instead of four, seven were used. This was one hand-held and six static cameras. Whilst this restricted the movement of the hand-held camera operator, this was balanced by having more variety of shot in the static shots. The main innovation is having more shots where just two takes are composited together to form a final shot. |